|
|
||||||
|
||||||
Starting with Qwerk robotics aimed boardby Andrew KirillovThe article gives introduction into Linux based Qwerk board used to control quite sophisticated robots. Also it provides information on how to start programming Qwerk using C#. |
Posted: December 4, 2008 Programming languages: C# |
|
Sample application (sources) – 97K Sample application (binaries) – 234K 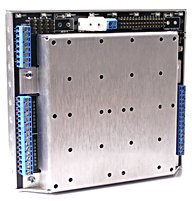
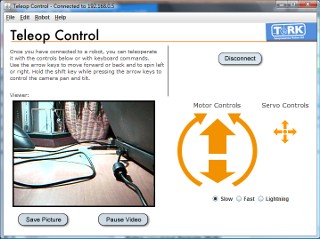
IntroductionIf you are a robotics hobbyist, then you may know that there are many robotics kits exist and most probably you use some of them to build your robots. Some of such robotics kits are simpler to start and they provide set of bricks and pieces to build different robots. On the contrary some robotics kits are harder to start and they require more knowledge of hardware/electronics and require some skills of building a robot from all you may find around (old toy cars and other stuff may work very well). Most probably the simplest and the most known robotics kits are Lego Mindstorms, which we’ve already discussed in the past building some car bots and pan-tilt camera. Of course these kits are really easy to start with robotics and require minimum knowledge of hardware and electronics. But the simplicity comes in the cost of limitations – unfortunately it is possible to control maximum 3 motors and receive inputs from maximum of 4 sensors, which may not be enough for a sophisticated robots. So, after playing a bit with Lego, we may want to go further at some point of time searching for some other robotics kits. In the article we are going to make introduction of absolute contrast to Lego Mindstorms – Qwerk. What is Qwerk? Qwerk is an embedded computer with lots of I/O capabilities specifically for robotics, which is designed by Charmed Labs in collaboration with Robotics Institute of Carnegie Melon University. “Qwerk runs full-blown Linux, so it can handle sophisticated applications that require high-level programming, multitasking, Internet connectivity and networking. It has an onboard switching power supply that is 90% efficient – important when using battery power. It has four closed-loop motor controllers that incorporate sensor less back-EMF velocity and position sensing. It has a built-in audio amplifier for playing sounds/music. It has two USB 2.0 host ports for plugging in standard PC USB peripherals such as webcams. It has built-in 100BT Ethernet. And it has lots of generic digital and analog I/O. Qwerk is FPGA-based, so it is highly customizable.” What makes Qwerk to be an absolute contrast to Lego Mindstorms? Qwerk has nothing provided with it. Actually there is no set at all – just the Linux board and that is all. No motors, no building pieces, no building instructions, nothing in the box except the board. This does not make it so simple to build a robot – instead of following instructions and building a robot from already prepared for you bricks, you will need to get some basics in electronics and search for what to connect and how to connect to the board. So what it is the benefit? The benefit is that there are almost no restrictions on what to connect to the board – connect those motors or sensors, which we need. 4 motor controllers, 16 RC-servo controllers, 16 digital I/Os, 8 analog inputs – quite a lot could be connected to the board. And don’t forget about two USB ports – one of them may take USB web camera and the second may take Wi-Fi adapter! It may not be so simple to find the right pieces and assemble your robot as it could be with Lego, but if you are prepared for building robot of your imagination, then it is not an issue. Starting with QwerkIf you open a Qwerk box, you will find there quite short note with information on how to start. Basically it says: “Visit Qwerk Start page for information on how to get started”. That is all. And the Qwerk board in the box of course … Going to the Qwerk Start page you will not find massive amount of information there, but some useful links, which will give you directions to go. The most useful one will lead you to the TeRK site. TeRK, which stands for Telepresence Robot Kit, is a project of the Community Robotics, Education and Technology Empowerment (CREATE) Lab at Carnegie Mellon University’s Robotics Institute. And here, on the TeRK site, you will find all you need to start with your Qwerk board – some robots’ recipes, software to control your board, information about the project, discussion forum, etc. Before we start with different software available on the TeRK site or with updating Qwerk’s firmware we will need to perform its initial configuration. There are different instructions available for beginners on how to do this, but many of them rely on the fact that we will connect to our Qwerk through relay server (see architecture overview), which is to me a bit useless. Why would I need to connect my home PC to my Qwerk at home through a server running somewhere? So, I would suggest a quicker road – connect to Qwerk through serial cable using terminal application, check its IP address, then connect to the IP through web browser and perform configuration there (like setting static IP address, connection type, etc). After that we are welcome to start with TeRK applications and try manipulating our Qwerk. The simplest application to try is Qwerkbot Teleop Interface. The application gives possibility to get view of web camera connected to Qwerk and manipulate its motors. Note: if your camera is connected to the board, but you see nothing, then first of all you need to check if the camera is supported by Qwerk’s firmware and then make sure firmware is updated.
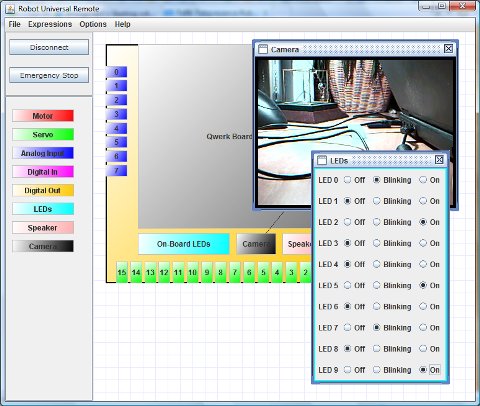
Another application to try is Robot Universal Remote (RUR). The application is much more powerful than the previous one and it provides access to entire Qwerk’s hardware – camera, motors, servos, inputs, outputs, leds, etc.
We may experiment with TeRK applications for a while, but they will not take long time from us, if our aim is to write our own software to manipulate our own robot … Writing an application to manipulate QwerkBefore we start writing our own software to manipulate our Qwerk, we’ll need to download TeRK Source Code package. The package contains all the sources of different TeRK applications, which could be useful to study as examples. Also the package contains libraries and definitions, which we may need to writeour own software. Downloading, unpacking and investigating a bit the software package brings us some news – a good one and a bad one:
So, if you are not Java developer, then take the second news. The news is getting a bit worse taking into account that the amount of documentation is quite limited, so it may be not that obvious how to start your Qwerk application. But, of course it will not break us and we’ll not stop with the powerful Linux board. So, let’s continue and write our application step by step … I am choosing C# programming language for the start, but writing application using different programming language is not hard – initial steps are very similar. The key to understand is how to communicate with Qwerk. Although there is some overview of Qwerk’s architecture on the TeRK site and a bit about communication, there are no details about what is really the Qwerk’s communication protocol, how to connect and what to send to it to make it do something. But, there are some hints in the software package we’ve downloaded and also there is a small, but very useful, note on the Qwerk’s site: “TeRK is based on the Internet Communications Engine (ICE) an object-oriented remote procedure call (RPC) mechanism. ICE allows Qwerk to function as a server, serving I/O requests over the wired or wireless network, including the Internet”. Ice is a new way of writing client/server distributed applications. The idea of Ice is similar to DCOM and CORBA, but it is a different implementation with some different features. The Ice overview is out of scope of this article, but I would recommend spending some time reading Ice documentation to understand its concepts and basics, which will help a lot in writing application to communicate with Qwerk from scratch. What the Ice means for us, for Qwerk developers? Well, actually it means quite nice thing that we don’t need to care about the exact communication protocol’s specification, like what is the message format to send to/receive from Qwerk and other communication details. Ice gives the same, what we had before with COM/DCOM, for example, – once you have interface definition, you may generate stubs from it and proxies. Stubs are not required for us, but are required for server side developers – those who develop Qwerk’s firmware. But proxies are for us – for client side developers. Our aim is to find definitions of Qwerk’s interfaces, generate C# code from them and start use it. The interface definition language for Ice is called Slice. What we need to do is to find all required Qwerk’s Slice definitions and compile them using Slice to C# compiler. The required for us Slice files we may find in /TeRKPeerCommon/code/slice folder of the TeRK’s software package. Here is the list of files we’ll need for the start (find them in subfolders of the above mentioned folder): TeRKCommon.ice LED.ice AnalogIn.ice Audio.ice DigitalIn.ice DigitalOut.ice Motor.ice Servo.ice Qwerk.ice Video.ice In Ice binaries folder, we may find Slice to C# compiler (slice2cs.exe), which we need to build C# sources for the Qwerk’s Slice interfaces. But, before we start compiling those files, we’ll need to find one more Slice definition, which is also required and nothing will compile without it. The required Slice file is MRPLPeer.ice. I don’t know why it was done so, but hackers from Carnegie Mellon University decided to hide it so deeply, that you may feel a bit lost trying to find it. If you search entire package, you will not find it (at least it was so with the recent version of software package I’ve downloaded). The file is actually there, but for some reasons it is kept in JAR archive (again, everything is for Java developers): /TeRKBuild/lib/mrpl/mrpl-peer-src.jar. Now when we have all required Slice interfaces, it is time to compile them. Note: you may keep all interfaces in their original folders and just try to tweak Slice compiler’s parameters, but I decided to skip this – since some files are so hidden, that it still will not work from scratch. Instead of this I’ve put all required Slice interface into single folder, updated include directives in them and built with the below BAT file: set ICE_HOME=c:Ice 3.3.0 "%ICE_HOME%binslice2cs.exe" -I"%ICE_HOME%Slice" MRPLPeer.ice "%ICE_HOME%binslice2cs.exe" -I"%ICE_HOME%Slice" TeRKCommon.ice "%ICE_HOME%binslice2cs.exe" -I"%ICE_HOME%Slice" LED.ice "%ICE_HOME%binslice2cs.exe" -I"%ICE_HOME%Slice" AnalogIn.ice "%ICE_HOME%binslice2cs.exe" -I"%ICE_HOME%Slice" Audio.ice "%ICE_HOME%binslice2cs.exe" -I"%ICE_HOME%Slice" DigitalIn.ice "%ICE_HOME%binslice2cs.exe" -I"%ICE_HOME%Slice" DigitalOut.ice "%ICE_HOME%binslice2cs.exe" -I"%ICE_HOME%Slice" Motor.ice "%ICE_HOME%binslice2cs.exe" -I"%ICE_HOME%Slice" Servo.ice "%ICE_HOME%binslice2cs.exe" -I"%ICE_HOME%Slice" Qwerk.ice "%ICE_HOME%binslice2cs.exe" -I"%ICE_HOME%Slice" Video.ice If everything is fine, we should get 11 C# source files at this point – one per each Slice interface file. Now it is time to start new Visual C# project, add 11 C# source files we just built and add two references to Ice libraries – Ice and Glacier2 (can be found in binaries folder of Ice installation). The first thing to do – is to establish connection with our Qwerk board (hope you’ve read a bit of Ice documentation briefly):
Ice.Communicator iceCommunicator = null;
TeRK.QwerkPrx qwerk = null;
try
{
    // perform Ice initialization
    iceCommunicator = Ice.Util.initialize( );
    // get Qwerk object
    Ice.ObjectPrx obj = iceCommunicator.stringToProxy( "'::TeRK::TerkUser':tcp -h " +
                                                        ipAddress + " -p 10101" );
    qwerk = QwerkPrxHelper.checkedCast( obj );
    if ( qwerk == null )
        throw new ApplicationException( "Invalid proxy." );
    // ...
}
catch
{
    // ...
}
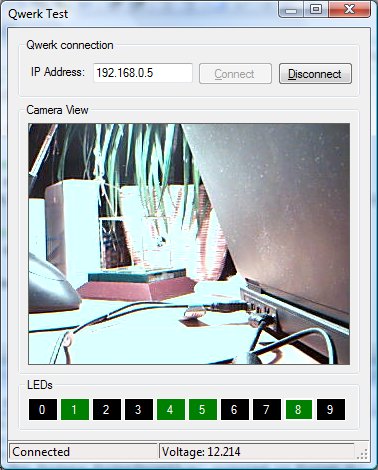
As we can see from the code above, we get there an instance of QwerkPrxobject, which is a proxy generated by Ice compiler from Slice’s definition of Qwerk interface. Using the object, we may call methods defined by the interface. For example, let’s get Qwerk’s state, which contains state of all motors, inputs, etc. // get Qwerk's state QwerkState state = qwerk.getState( ); // get its power in volts double power = (double) state.battery.batteryVoltage / 1000; Well, what can we do quickly with Qwerk without connecting motors and different sensors to it? Let’s turn on/off Qwerk’s on-board leds (it has 10 leds!):
Ice.Communicator iceCommunicator = null;
TeRK.LEDControllerPrx leds = null;
try
{
    // ...
    // get LEDController object
    obj = iceCommunicator.stringToProxy( "'::TeRK::LEDController':tcp -h " +
                                            ipAddress + " -p 10101" );
    leds = LEDControllerPrxHelper.checkedCast( obj );
    if ( leds == null )
        throw new ApplicationException( "Invalid proxy." );
    // define which leds's state we would like to update
    bool[] ledMask = new bool[10] { true, true, true, true, true,
                                    true, true, true, true, true };
    // define states of all leds
    LEDMode[] ledModes = new LEDMode[10]
    {
        LEDMode.LEDOff, LEDMode.LEDOn, LEDMode.LEDBlinking, LEDMode.LEDOff,
        LEDMode.LEDOff, LEDMode.LEDOn, LEDMode.LEDBlinking, LEDMode.LEDOff,
        LEDMode.LEDOff, LEDMode.LEDOn
    };
    // update leds
    leds.execute( new LEDCommand( ledMask, ledModes ) );
}
Another quick thing we may try is to get view of USB web camera connected to Qwerk:
Ice.Communicator iceCommunicator = null;
TeRK.VideoStreamerServerPrx video = null;
try
{
    // ...
    // get VideoStreamerServer object
    obj = iceCommunicator.stringToProxy( "'::TeRK::VideoStreamerServer':tcp -h " +
                                            ipAddress + " -p 10101" );
    video = VideoStreamerServerPrxHelper.checkedCast( obj );
    if ( video == null )
        throw new ApplicationException( "Invalid proxy." );
    // start the camera
    video.startCamera( );
    // get video frame from the camer
    TeRK.Image qwerkImage = video.getFrame( 0 );
    if ( qwerkImage.format == ImageFormat.ImageJPEG )
    {
        // decode the image and display it PictureBox control
        pictureBox.Image = System.Drawing.Image.FromStream(
                new MemoryStream( qwerkImage.data ) );
    }
}
To make starting Qwerk programming with C# a bit easer, I’ve prepared a small demo application, which demonstrates all the above code in work (links can be found in the begining of the article). All you need to build the application is to install Ice on your PC.
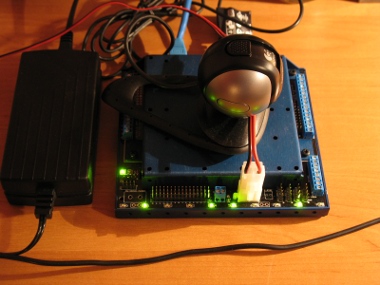
And here is the Qwerk itself with leds’ state we’ve set …
ConclusionWell, we’ve did it – we’ve wrote our first application to communicate with Qwerk! I must admit it was not that simple, but we did it. When I just got the Qwerk box and opened it, honestly, I as a bit shocked – just a Linux board and that is all. No building bricks, no building instructions, nothing. Then I just said to myself: “Hmm, of course it is not a Lego. Cool guys will build the robot they want themselves”. And that is the bonus – no restrictions, connect what you want, build what you want. When I started learning how to write applications to communicate to Qwerk, I was a bit depressed again. If TeRK’s source package could provide more docs/instructions or at least more comments in their sources … it could be much easer. But we’ve passed those steps, so now only building and writing further applications. Of course the article does not provide overview about all the aspects of software development for Qwerk. There is also another side, which we even did not touch – making modifications in Qwerk’s firmware, building it and loading. Also writing applications’ which run directly on Qwerk is left out of scope of the article. For those who are interested in these topics, I would recommend joining TeRK’s forum – there it is possible to find some more information and community of robots’ builders. The sad news is that lately it is not possible to order Qwerk board from Charmed Labs any more. It looks like Innovation First, the company which produces the VEX line of robotics products, has licensed Qwerk robot controller, so now we need to wait for the new version from them. Innovation First is going to collaborate with Charmed Labs to enhance the excising version of Qwerk and then make it available. Hope we can see a new robotics kit soon from Innovation First and try all its new features. |
||||||
|
|
||||||