|
|
||||||
|
||||||
Lego Pan Tilt Camera and Objects Trackingby Andrew KirillovTurning regular USB web camera into pant tilt camera using Lego Mindstorms robotics kit and tracking simple objects. |
Posted: November 19, 2008 Programming languages: C# AForge.NET framework: 2.0 |
|
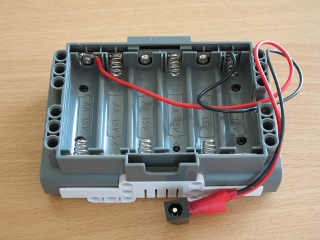
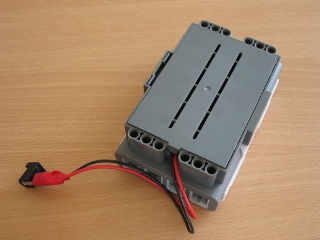
Sample application (sources) – 94K Sample application (binaries) – 85K IntroductionIf you work in computer vision area, then you know for sure – camera is nice, but pan-tilt camera is much better! But what if you don’t have special pan-tilt camera, but just a regular USB web camera? Well, that is not a big issue if you like building things on your own. Doing a quick search on the Internet, you may find different recipes of building pan-tilt cameras. Some of these recipes use quite simple electronics and stepper motors, but other recipes use different special pan-tilt equipment, which may be used for turning any camera into pan-tilt camera. In this article we are going to discuss one more recipe of building home-made pan tilt camera, which utilizes regular USB web camera and Lego Mindstorms NXT robotics kit. We’ve already discussed communication with Lego robotics kits using AForge.NET framework in another article, so now we’ll take that as a base and concentrate on building our pan tilt device and manipulating it. After we build our pan tilt camera, we are going to make use of it – we’ll try to locate some objects and track them utilizing image processing routines from the above mentioned AForge.NET framework. This part will be quite generic and may be applied to any camera with pan-tilt device. So, let’s start building … Changing power supply of Lego MindstormWhen you build a robot, which moves around certain areas, mobility of the robot is quite important and any wire may break it easily. So, mobile robots should be wireless carrying battery with them and doing wireless communication with host if required. However, pan tilt cameras don’t need to move around, but they just need to stay on a place turning their camera only for a certain degree. This means that instead of wireless mobility we may better want constant power supply, which makes device to work as long as required. So, the first step we are going to do is to get rid of Lego Minstorm’s batteries and power it with regular power adapter. The NXT brick requires 9 volts power supply, which was originally achieved utilizing 6 batteries – each battery provides 1.5 volts. What we need to do is to find a power adaptor, which provides something similar. I did not have an exactly 9 volts adapter, but it looks like 7.5 volts also works fine. So, taking some wires and soldering tools we may make our NXT brick powered by power adapter …
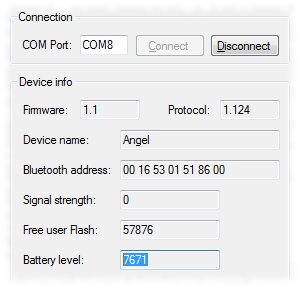
Plugging power adapter to the upgraded NXT brings it to life! We may use simple NXT test application from AForge.NET framework to check connectivity and see brick’s power – it shows 7671 millivolts for our 7.5 volts adapter.
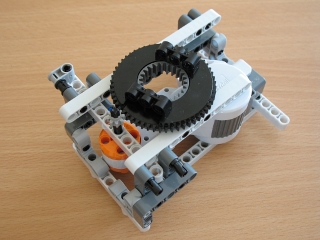
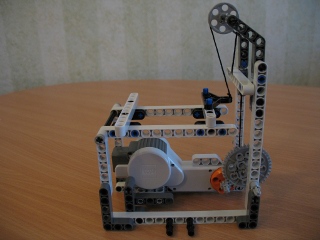
Building pan tilt cameraWell, it is a bit hard to provide step by step instruction on how to build pan and tilt modules from Lego NXT pieces. But actually it is not required, since it may kill creativity and imagination. The pan module is quite easy – the simplest way is to use provided by the set rotating platform piece. The tilt module may require a bit of work. I’ve tried several variants and came to the decision that the block based one with a thread manipulated platform works best for me.
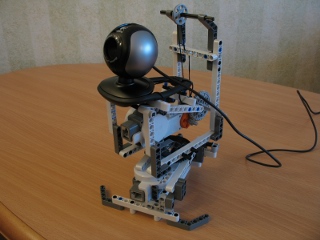
Joining both parts together and attaching a Logitech camera resulted in quite interesting construction, which gave the camera 2 degrees of freedom. Yes, the device does not look small, but was build using generic parts from Lego constructor. And actually it is enough for our further experiments.
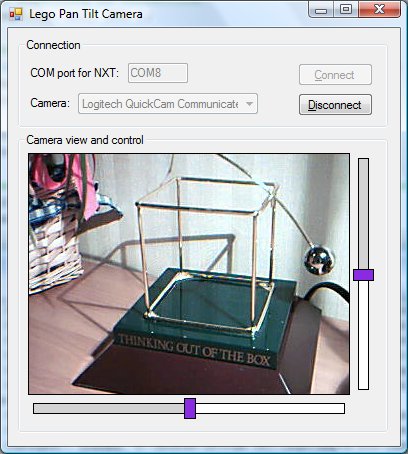
Camera view and its manipulationBefore we start with camera manipulation, we need to get view from it first. That is quite simple to do and VideoSourcePlayer control will do all the work for us, since it is responsible for video displaying. All we need to do is to put the control on our form, create required video source provider and give it to the control. In our case we are going to use VideoCaptureDevice class, which works with capture devices through DirectShow interface: VideoCaptureDevice videoSouce = new VideoCaptureDevice( deviceMonikerString ); videoSourcePlayer.VideoSource = videoSouce; videoSourcePlayer.Start( ); Now when we have the view we need to manipulate it. To do this we’ll use two special controls, which allow controlling the camera – one controls the pan device and the second controls the tilt device. These are simple controls, which have a manipulator in the center and dragging this manipulator away from center results in camera movement in one or another direction. The screen shot below may clarify the idea …
We are not going to discuss the code of the manipulation control here (it may be found in the attachment to the article), but mention that it generates an even on manipulator’s position change, which provides its current position in the [-1, 1] range (0 means that manipulator is in the center). So, receiving the event we just need to convert manipulator’s position to motor’s power and then turn it on (we are using NXTBrick class from AForge.NET framework, which was discussed previously).
// convert power to the |[55, 60]| range
int power = (int) ( 5 * panMotorPower + 55 * Math.Sign( panMotorPower ) );
NXTBrick.MotorState motorsState = new NXTBrick.MotorState( );
// check if we need to stop
if ( power == 0 )
{
    motorsState.Mode      = NXTBrick.MotorMode.None;
    motorsState.RunState  = NXTBrick.MotorRunState.Idle;
}
else
{
    motorsState.Mode       = NXTBrick.MotorMode.On;
    motorsState.RunState   = NXTBrick.MotorRunState.Running;
    motorsState.TachoLimit = 0;
    motorsState.Power      = power;
    motorsState.TurnRatio  = 80;
}
nxt.SetMotorState( NXTBrick.Motor.A, motorsState );
Note: The power conversion equation may look differently – it all depends on how fast you want your motor moving. So now we have a pan tilt camera built from Lego Mindstorms NXT Robotics kit and Logitech camera, which can be manipulated manually with regular mouse and two controls. The next step is to make it moving on its own … Object TrackingPan tilt cameras are much more interesting than static cameras, because they open quite interesting possibilities like object tracking, for example. Since we’ve just built a pan tilt camera, let’s try to accomplish the task of tracking some simple objects. For example, let’s track a ball of certain color. Before we start tracking something, the first task is to detect an object and get its position on the image acquired from camera. Since we are going to track simple objects of solid colors, the object detection may be done quite easily utilizing image processing routines provided by the AForge.NET framework. The first step to do is to perform color filtering keeping only objects of the colors we are interested in and removing all the rest, which may be achieved using ColorFiltering class for example: // create color filter ColorFiltering colorFilter = new ColorFiltering( ); // configure the filter to keep red object only colorFilter.Red = new IntRange( 110, 255 ); colorFilter.Green = new IntRange( 0, 60 ); colorFilter.Blue = new IntRange( 0, 60 ); // filter image colorFilter.ApplyInPlace( image );
Now, when we have an image containing the interesting object only, we need to get its coordinates. This may be achieved by utilizing BlobCounter class, which is able to locate stand alone objects. However this class works only with grayscale and binary images, so we need to use GrayscaleBT709 filter before, for example:
// create grayscale filter
GrayscaleBT709 grayscaleFilter = new GrayscaleBT709( );
// apply it to color filtered image
Bitmap grayImage = grayscaleFilter.Apply( image );
// create blob counter
BlobCounter blobCounter = new BlobCounter( );
// configure it to filter out small objects
blobCounter.MinWidth  = 25;
blobCounter.MinHeight = 25;
blobCounter.FilterBlobs = true;
// set ordering - bigger objects go first
blobCounter.ObjectsOrder = ObjectsOrder.Size;
// locate blobs
blobCounter.ProcessImage( grayImage );
Rectangle[] rects = blobCounter.GetObjectRectangles( );
// get the biggest object
if ( rects.Length > 0 )
{
    Rectangle objectRect = rects[0];
    ...
}
As we can se from the code above, we take the first object only, which is the largest, since we don’t want to handle any small objects, which may have similar color, or just noisy pixels. Now, the last step is to get coordinates of object’s center and move the camera towards it … int objectX = objectRect.X + objectRect.Width / 2 - image.Width / 2; int objectY = image.Height / 2 - ( objectRect.Y + objectRect.Height / 2 ); Finally, let’s see this in action … ConclusionWell, finally we’ve built a pan tilt camera, which is even able to track some objects. Not a superior camera, but something made from generic Lego pieces. I’ve discovered some underwater stones with my Lego NXT motors, which don’t allow performing precise movements, what makes it hard to implement smooth movement of the camera. According to Lego documents motors’ power is in [0, 100] range ([-100, 0] for backward movement). However setting the power to 50 gives nothing except nasty noise, but setting it 60 may result in too fast movement, which is not acceptable for precise manipulations. Regarding color filtering, which we’ve use to locate the object of our interest, there are different other approaches, which may give even better results. The ColorFiltering filter, which we’ve applied, is the simplest one and performs color filtering in RGB color space, which gives the fastest performance on RGB images. However filtering in HSL color space, for example, may give better results in terms of locating only colors we want and rejecting the rest (see HSLFiltering filter). Although the article is describing object tracking using manually built pan tilt camera from Lego NXT constructor’s pieces, the tracking code may be easily applied to any other pan tilt camera. All you need is to detect an object, calculate its center’s coordinates and the move the camera towards it. |
||||||||||||
|
|
||||||||||||