|
|
||||||
|
||||||
Driving Lego Mindstorms Botby Andrew KirillovThe article provides introduction to manipulation with Lego Mindstorms using AForge.NET. |
Posted: October 30, 2008 Programming languages: C# AForge.NET framework: 2.0 |
|
Sample application (sources) – 163K Sample application (binaries) – 134K IntroductionRobotics topics were always interesting to me and I always wanted to do something in this area. Nowadays robots are getting closer and closer to us, migrating from regular industrial robots, which drive production lines, to robots, which interact with people and assist them in their daily routines. Of course robots existing today are getting very complex rapidly and require a lot of research work to teach them to do some useful work, but if you would like to start in this area, you may want to start with something simple. Fortunately there are many different robotics kits available to hobbyists and researchers, which could be used to start quickly in robotics area. Some of them simpler, some of them are more sophisticated and require more knowledge. We’ll start with the simplest kits, I guess, existing today – Lego Mindstorms Robotics Kits. Lego has two robotics kits, which are known as RCX and NXT. The RCX kit was Lego’s first robotics kit and now it does not look to be available in Lego’s stores (but still may be found and ordered on eBay or somewhere else) and NXT is the latest kit, which is available in Lego’s stores We’ll try both of them … Before we start I would like to note that this article is not related to the topic of robots building using Lego’s kits – there are enough manuals and instructions provided by Lego and available on the Internet. The article is going to be dedicated to the topic of manipulating by Lego robot from C# applications using AForge.NET framework. Lego Mindstorms RCX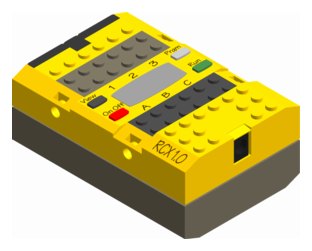
It looks like Lego has dropped support of its Lego RCX brick already, so it is getting harder and harder to find any documentation about it. Few months ago it was still possible to find Lego RCX SDK on the official website (which was quite helpful), but it has gone. So now all the knowledge may be gathered only from different websites and projects, which still support this device. One of the most helpful resources on-line about RCX is called RCX Internals and was put together by Kekoa Proudfoot. There it is possible to find information as about RCX’s hardware, as about its communication protocol and other stuff. To communicate with PC, Lego RCX brick uses infrared communication interface, which requires Lego’s IR transceiver to be connected to PC. The IR tower comes in two variants – early versions were connected through serial interface to PC, but latest versions are connected using USB interface to PC. In the case if you have serial IR tower, then you may find details of serial protocol on RCX Internals website, where you may also find description of all commands to manipulate the device. Since serial Lego IR transceivers are quite old and mostly USB transceivers are in use, the description of serial communication protocol does not make a lot of use for us. Fortunately there is an alternative. RCX SDK includes GhostAPI, set of libraries which may be used by application developers to control Lego RCX brick from their applications. These libraries come as Dynamic Loadable Libraries (DLLs) and may be used from most of programming languages. Since we a going to use C#, we are going to use interoperability services to make use of the GhostAPI. Well, we’ll skip description of how to interop GhostAPI, since this API is represented by regular DLLs and there is a lot of information all over the Internet about how to access DLL’s APIs from .NET languages like C#. Instead of this we’ll describe a bit how to work with GhostAPI taking already interopped API, which is represented by C# class (methods of this class have the same name as original GhostAPI’s functions, so there should be zero confusion regarding the interopped version). The first thing we need to do is to connect to our RCX brick. Connection to RCX brick is done in 3 steps: 1) creating communication stack, where we need to specify communication port (USB or serial) and protocol; 2) selecting device to communicate to and 3) connecting to the selected device.
IntPtr stack;
uint status;
// create stack
status = GhostAPI.GhCreateStack(
    "LEGO.Pbk.CommStack.Port.USB",
    "LEGO.Pbk.CommStack.Protocol.IR",
    "LEGO.Pbk.CommStack.Session",
    out stack );
if ( !GhostAPI.PBK_SUCCEEDED( status ) )
    return false;
// select first available device
StringBuilder sb = new StringBuilder( 200 );
status = GhostAPI.GhSelectFirstDevice( stack, sb, sb.Length );
if ( !GhostAPI.PBK_SUCCEEDED( status ) )
    return false;
// open communication stack
if ( !GhostAPI.PBK_SUCCEEDED( GhostAPI.GhOpen( stack ) ) )
    return false;
// we are connected to RCX ...
Now, when we have connection to RCX brick, we may want to send some commands to it, which may instruct the brick to perform an action. Command sending is done in several steps: 1) creating command queue; 2) adding commands to the queue; 3) executing the commands’ queue and 4) destroying the queue.
IntPtr queue;
uint status;
// create command queue
status = GhostAPI.GhCreateCommandQueue( out queue );
if ( !GhostAPI.PBK_SUCCEEDED( status ) )
    return false;
// append command to the queue
status = GhostAPI.GhAppendCommand( queue, command,
                  command.Length, expectedReplyLen );
if ( GhostAPI.PBK_SUCCEEDED( status ) )
{
    // execute command
    status = GhostAPI.GhExecute( stack, queue );
    ...
}
// destroy command queue
GhostAPI.GhDestroyCommandQueue( queue );
As we can see from the code above, we pass some sort of command variable to the GhostAPI.GhAppendCommand(). And as we may assume, this is something what tells RCX what to do. Our assumptions are correct – the command variable is just a byte array, which contains command’s code and its parameters. And here the RCX internals website becomes really useful, since it provides description of all commands supported by Lego Mindstorm RCX brick. For example, if we want our RCX brick to beep twice, we may use Play Sound request. According to its description all we need to send is 2 bytes: byte of command code (actually all RCX commands’ codes are encoded with 1 byte) and one byte parameter, which is sound type to play.
// 0x51 - play sound command comde
// 0x01 - double beep sound type
byte[] command = new byte[] { 0x51, 0x01 };
As we may see from RCX commands’ documentation, some commands may return reply, for example state of RCX sensors. So, the last step after sending a command is to retrieve its reply:
// execute command
status = GhostAPI.GhExecute( stack, queue );
if ( GhostAPI.PBK_SUCCEEDED( status ) )
{
    IntPtr commandHandle;
    uint replyLen;
    // get first command and its reply data lenght
    if (
        ( GhostAPI.PBK_SUCCEEDED(
            GhostAPI.GhGetFirstCommand( queue, out commandHandle ) ) ) &&
        ( GhostAPI.PBK_SUCCEEDED(
            GhostAPI.GhGetCommandReplyLen( commandHandle, out replyLen ) ) )
        )
    {
        // get reply
        status = GhostAPI.GhGetCommandReply( commandHandle, reply, replyLen );
    }
}
Does all the above look complex or confusing? Maybe yes, maybe not. Fortunately it is not required to study all the details of GhostAPI just in case you want to control your RCX brick from C# – AForge.NET already provides class to operate your RCX device in much more friendlier manner. The RCXBrick class allows to perform most frequently required actions like controlling motors, getting sensors’ values, playing sounds, etc.
// create an instance of RCX brick
RCXBrick rcx = new RCXBrick( );
// connect to the device
if ( rcx.Connect( ) )
{
    // set forward direction of motor A
    rcx.SetMotorDirection( RCXBrick.Motor.A, true );
    // set power of motor
    rcx.SetMotorPower( RCXBrick.Motor.A, 1 );
    // turm motor on
    rcx.SetMotorOn( RCXBrick.Motor.A, true );
    // ...
    // turn off motors A, B and C
    rcx.SetMotorOn( RCXBrick.Motor.ABC, false );
    // get first sensor's value
    short value;
    if ( rcx.GetSensorValue( RCXBrick.Sensor.First, out value ) )
    {
        // ...
    }
    // ...
}
The AForge.NET framework also provides a simple RCX brick test application, which allows to test most of the RCX’s functionality and also serves as a simple sample of RCX brick controlling from .NET application.
Lego Mindstorms NXT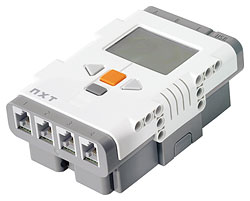
Lego Mindstorms NXT is a new robotics kit from Lego, which is actively supported, what makes it easy to find different information about it, robots’ building recipes, projects which support it and many other stuff. The device is more sophisticated supporting wider range of sensors, what makes more fun for robot’s builders, and supporting more flexible commands set, what provides more opportunities for robot’s programmers. Each Lego NXT brick supports communication with PC over two interfaces: Bluetooth and USB. Since wireless robots are more flexible in their movements and have a chance to be autonomous, we’ll concentrate on Bluetooth communication with these devices. The nice thing is that Lego provides information about Bluetooth communication protocols and description of all commands supported by the device. Although this information is not reach, it is available on their Lego NXT SDK page. Note. In the case if you don’t want to study communication protocol details, but would like to use something, what hides all the complexity, you may try Fantom library, which is part of Lego NXT SDK. The advantage of the library is that it gives you support of all communication interfaces. The disadvantage is that it adds one more dependency to your software, what is not always preferred. So, we’ll go for manually implemented Bluetooth communication. Fortunately this is not that complex, like it may sound initially – PC’s Bluetooth adapter may be configured to provide virtual serial port to communicate with Bluetooth devices. So, all we need is to write some code which communicates over serial port sending some commands to NXT brick in certain format and receiving replies. The first thing we need to do is the same as it was before in the case of RCX – connect to our device. Since we are using virtual serial port to communicate with device, the first step is extremely simple – just create instance of serial port class and open specific port: // create serial port, specifiying port name (COM8, for example) SerialPort port = new SerialPort( portName ); // connect to NXT device port.Open( ); Yes, it is that simple! Now, we need to send a message to NXT asking it to do something. This also may be done as simple as connection – all we need to do is to send byte array to the opened serial port.
// message to send to NXT
byte[] message = new byte { ... };
// send 2 bytes of message length
// (suppose we have short message not exceeding 255 bytes length)
byte[] messageLength = new byte[2] { (byte) length, 0 };
port.Write( messageLength, 0, 2 );
// send actual message
port.Write( message, offset, length );
As we may see from the code above, the NXT’s Bluetooth communication protocol assumes that first of all we need to send 2 bytes of message length and then the actual message right after. What is the format of messages to send? The message format is quite simple and is described in document’s provide by Lego on the NXT SDK page:
For example, let’s do the same as we did before with RCX – prepare a command to play a tone: short frequency = 300; // tone frequency in Hz short duration = 1000; // tone duration in milliseconds byte[] command = new byte[6]; // prepare command command[0] = (byte) 0x00; // direct command requiring reply command[1] = (byte) 0x03; // play tone command command[2] = (byte) ( frequency & 0xFF ); command[3] = (byte) ( frequency >> 8 ); command[4] = (byte) ( duration & 0xFF ); command[5] = (byte) ( duration >> 8 ); The above command may actually use another type – 0x80, which does not require reply. The only reason of asking reply from such command is to make sure NXT got the command successfully and processed it. Since different commands may result in reply form NXT, we may want to read it: // read 2 bytes of message length // - assume we expect a small message int toRead = port.ReadByte( ); // - skip the second bytes port.ReadByte( ); // read the actual message byte[] buffer = new byte[toRead]; length = port.Read( buffer, 0, toRead ); The format of reply data look very similar to command data:
That is all about communicating with Lego Mindstorm NXT over Bluetooth – looks quite simple and does not require any additional libraries. As it was in the case of RCX, all the information about NXT above is just for those of us, who wants to get some ideas about how communication is done with Lego Mindstorms NXT device. But if we just want to start working with our Lego without too much complexity, we may take AForge.NET framework, which provides NXTBrick class allowing us to control motors, sensors and perform other actions:
// create an instance of NXT brick
NXTBrick nxt = new NXTBrick( );
// connect to the device
if ( nxt.Connect( "COM8" ) )
{
    // run motor A
    NXTBrick.MotorState motorState = new NXTBrick.MotorState( );
    motorState.Power      = 70;
    motorState.TurnRatio  = 50;
    motorState.Mode       = NXTBrick.MotorMode.On;
    motorState.Regulation = NXTBrick.MotorRegulationMode.Idle;
    motorState.RunState   = NXTBrick.MotorRunState.Running;
    motorState.TachoLimit = 1000;
    nxt.SetMotorState( NXTBrick.Motor.A, motorState );
    // get input value from the first sensor
    NXTBrick.SensorValues sensorValues;
    if ( nxt.GetSensorValue( NXTBrick.Sensor.First, out sensorValues ) )
    {
        // ...
    }
    // ...
}
And also the framework provides NXT brick test application, which may be used to test communication with NXT brick and also serves as sample of controlling the device from C#.
Driving Lego Car BotNow when we know how to communicate with different Lego Mindstorms bricks, it is time to build something and manipulate it from C#. We’ll start with classics and build some simple car bots.
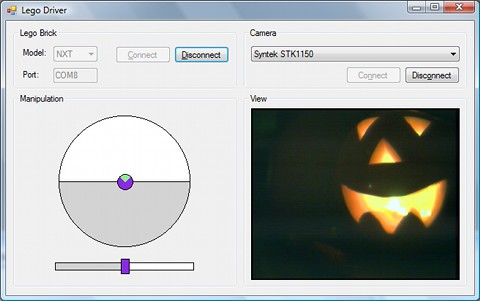
How are we going drive our bots setting required speed and direction? We need to mention that these bots don’t have turning left-right wheels for directing them. Instead of this they just have two independent motors, which are connected to right and left wheels. So, if you would like to drive straight, you just need to set equal power to both wheels. If you would like to turn, you need decrease power of the wheel in the direction you want to drive. Such bots could be naturally manipulated with a joystick or a gamepad. But what if we don’t have them? Or would like to control these bots with just a regular mouse … Well, it is not that complex to write our own “software” kind of joystick. Let’s create a circular control and put a manipulator into the center of the control. Clicking the manipulator with mouse’s left button and dragging it away from control’s center will lead to bot’s movement. Now, let’s divide the control into two parts: upper part is for forward movement, lower part is for backward movement. So, if we drag the manipulator straight upward from center, the bot will move straight forward. But moving the manipulator straight downward from center will move the bot straight backward. If we want to turn our bot left/right, then we just need to drag the manipulator into corresponding direction away from center. So, dragging manipulator into different directions should result bot moving into different direction. Regarding movement speed, it is quite simple – the further away our manipulator is from center, the faster our bot is moving. The below picture demonstrates the look of the control (the upper control).
Dragging manipulator of our “software” joystick results in firing control’s events, which notify about manipulator’s position changes providing its Cartesian coordinates (X,Y – position relative to control’s center). All we need to do is to recalculate these coordinates into power of both motors (we’ll skip this geometry code here, since it may be found in the attached demo application). The control we got is quite nice and allows us to move our car bot as forward, as backward in different directions and with different speed. And all this is just with a regular mouse. However, this control still does not allow us one feature, which is extremely useful – turning a bot without moving away (turning staying on place). From bot’s perspective it is quite simple to do – we just need to set the same absolute power to both motors, but for one motor the power should be positive and for another motor the power should be negative. For example, if we speak about NXT device, where motors’ power varies from -100 to 100 (0 – no motion), we may set power equals to 75 for the left motor and -75 for the right motor – this will result our bot turning in clockwise direction. So, this is simple for our bot, but not for our control, which does not allow motors to turn in different directions. To solve the on place turning problem, let’s create one additional control (2nd control on the picture above). The control looks like a slider control, where manipulator is placed in the middle of the control. If we drag the manipulator to the right from, the bot turns in clockwise direction. If we drag the manipulator to the left, the bot turns in counterclockwise direction. The further away the manipulator is from center, the faster movements bot has That’s all – 2 controls and we may control movements of our car bot in the way we want just with dragging regular mouse! To See or not to See?The car bots are nice for the start, but … What is the robot if it can see nothing? We definitely need to solve the issue, so let’s equip our NXT bot with an “eye” – with a camera. Since we don’t want to lose mobility we got from using Bluetooth communication, we definitely do not want to use wired cameras. This means we need a wireless camera. The simplest solution is to take a wireless IP camera, but in most cases they are not that small and require more power supply. So, we’ll take regular radio spy camera. Of course this solution requires receiver and video capture device, but it gives us quite small add-on to our bot. Let’s put the camera and NXT pieces together and attach it our car bot …
The last step is to bring the view from our camera to our application. The capture device I’ve used supports DirechShow, what makes it very easy to get access to the video. Using AForge.NET framework it takes few lines of code to enable video in our application. First of all we’ll put VideoSourcePlayer control on our form and then we’ll use VideoCaptureDevice to get frames from our camera: VideoCaptureDevice videoSouce = new VideoCaptureDevice( deviceMonikerString ); videoSourcePlayer.VideoSource = videoSouce; videoSourcePlayer.Start( ); Here is the vision comes …
And now all these in action … (sorry for the interference between my radio camera and Bluetooth communication – try camera with another frequency): ConclusionWell, somebody may say that Lego Minstorms are very simple devices and don’t allow to build sophisticated robots. Yes, they are not complex and don’t allow to plug a lot of stuff – maximum 3 motors and 4 sensors. But that is the key – the fact that they are not complex allows starting with robotics quite fast and does not require additional knowledge of electronics. Just a constructor, which allows you to concentrate on the idea of building your robot. And taking a look at Lego Mindstorm website or searching on the Internet you may find that even with this simple kit it is possible to do quite a lot. And very soon we’ll continue doing something different as with Lego, as with some other devices … |
|||||||||||
|
|
|||||||||||